Ideally, you could go hire a sound recording studio, but practically speaking, you don’t have to.
EQUIPMENT CHECKLIST
Here is a List of Minimum Standard of Equipment you will need in order to produce an outstanding Hypnosis Audio Recording
1 - A Quality Microphone
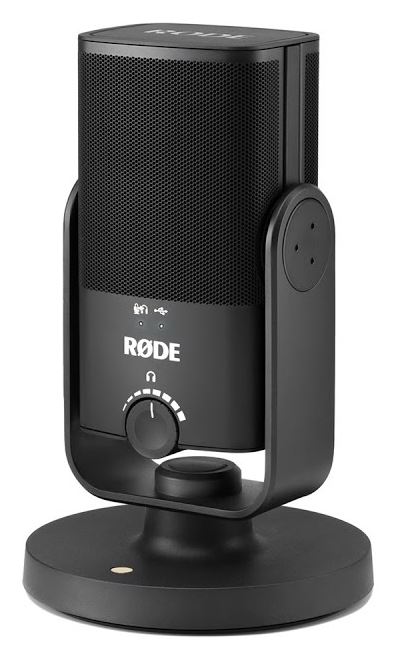
Best Microphone Under $100
Your recordings are only as good as the ‘weakest link’ in the signal chain, but if you only have a budget of under $100 to spend, then we recommend the Rode NT-USB Mini.
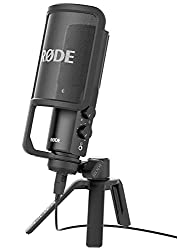
Best Microphone Under $200
By spending a little bit more you can get a microphone with much better quality. We recommend the Rode NT-USB.
2 - A Pop Filter
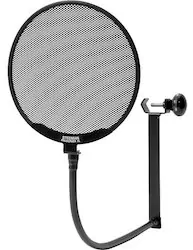
Prevent Plosives & Vocal Distortions
A pop filter helps to minimise the explosive air pressure caused by speaking that can spike the recording and cause a distorted sound.
Pop Filters are cheap but useful, and all do very much the same thing. Check out this one for only $15 here.
3 - Audio Recording & Editing Software

Recording & Editing
One of the cheapest Sound Recording & Editing Softwares to consider using is ‘Audacity‘ because it’s free!
Note: It use Audacity with MP3 files, you do need to install another update that is accessible on their site.
Other FREE Audio Recording & Editing Software to consider are:
4 - Background Music
Royalty Free Music
You can explore the vast libraries of Royalty Free music from anyone of the below listed sites.
Note: Ideally aim for music that has a constant volume, a relaxing beats per minute (BPM) and easily sits in the background of your clients awareness without distracting from your vocals.
Purchase or Get Custom Made
You can hire a Music Producer from either Fiverr.com or upwork.com who can create a custom music track for you.
Note:
- Fiverr.com is where you pay in advance and hope you get something of quality.
- Lower effort for you, but more risk of not getting what you want.
- Upwork.com is where you place your job, interview people for it, get them to submit their work, and then you pay them if it meets the requirements of the job.
- More effort for you, but lower risk of paying for something that you can’t use.
Make Your Own Using Synths
If you are feeling super motivated and creative, you can use any one of the below Synths to create your own trancescape and background music:
RECORDING CHECKLIST
You can use this Checklist to ensure you are best prepared to get the most out of your efforts and to avoid time-wasting mistakes, without the added cost and complexity of hiring out a sound recording studio:
1 - Check for Environment Sound Interference
Sit and listen in the space that you intend on recording in, paying careful attention to the sounds being produced in your environment such as;
- neighbours,
- dogs,
- air-conditioner fans,
- clocks ticking,
- computer fans,
- birds,
- traffic, etc.
Make decisions such as best time of day, and how you might otherwise be able to avoid some of these noisy distractions.
2 - Turn Off All Distractions
- Put your phone on silent,
- Put your computer’s notifications on silent,
- Turn off anything that is unnecessary that might make additional noise,
- Even advise people you live with, to help protect the silence you need to get the best recording.
3 - Check All Your Resources
Check that;
- Everything plugged in,
- It’s all working as it should,
- And perform a short test of your entire set-up.
QUICK RECORDING TIPS FOR BEGINNERS
Principle:
Keep things simple when starting out. Avoid overwhelm and avoid striving for perfection.
Made A Mistake Whilst Recording?
When recording, if you make a mistake,
- stop,
- CLAP LOUDLY,
- then go back to restart from the start of that sentence.
Edit Out Those Mistakes:
Once you’ve completed the recording:
- Go through the wave file in in your Sound Editing Program (E.g. Audacity) and look for the SPIKES which will reflect the loud claps.
- Highlight the parts you want to delete.
- Delete it out, and the audio should move back together and sound seamless.
Use the Multi-Track Function to Put Background Music On Your Vocals:
Next, drag-&-drop (or import) background music into another track in the Multi-track function of your sound recording program and then check to see that the volume of each track is set correctly.
Review Volume for both Vocals, Background Music & both of them:
Just check the volume is right (Use headphones for this. Don’t trust laptop speakers) and increase the GAIN/Volume if you need more volume.
Then Export your file.
It’s the smallest set of steps that will achieve a reasonably good result without going into detailed audio engineering and mastering.